Stargazing
Star Hopping
Introduction
 What is star hopping? It is a technique that amateur astronomers use to find celestial objects in the sky.
And that technique at its core is simple and straightforward: it's going from a known part of the sky to an
unknown part of the sky. We're hoping this sounds familiar since this is what we've done throughout the Stargazing pages.
What is star hopping? It is a technique that amateur astronomers use to find celestial objects in the sky.
And that technique at its core is simple and straightforward: it's going from a known part of the sky to an
unknown part of the sky. We're hoping this sounds familiar since this is what we've done throughout the Stargazing pages.
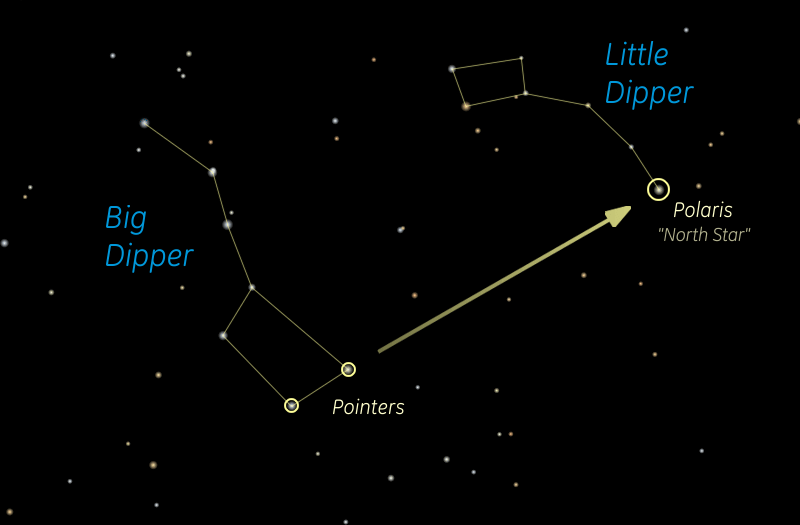
As an example, if you can find the Big Dipper in the sky, you can use the two pointer stars to find a single star: the North Star.
Though that does sound simple (and hopefully it is), finding a celestial object that can only be seen in a telescope (or binoculars or a finder scope) will be more challenging. This is where the technique of star hopping is so valuable.
Star Hopping With Binoculars
The following star hopping examples show a typical binocular field of view: 8X giving a 7.5° field. Your binoculars may differ. Also, these are just recommended star hops to these objects. There is not a necessarily right way. The right way is the one that works for you!

Andromeda Galaxy The constellation Andromeda is the figure formed by two curved lines of stars that radiate out away from the Great Square, coming off the upper left corner. Andromeda's head is the star at the top left corner of the Square. Going away from the Square, there's a pair of stars at her shoulders, a pair at her hips and a pair for her feet. The second pair of stars, her "hips", points us to the galaxy - follow the line between those stars going up and you'll hit two more stars which just bracket the galaxy nicely for you. It's up and a little to the left of dead center between those two stars, and is very obvious in a pair of binoculars, almost independent of how dark your sky is.
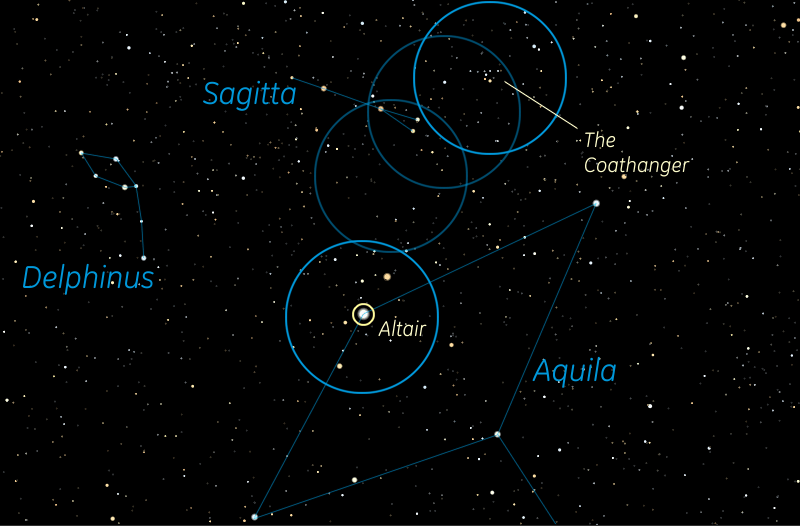
Coathanger Altair is a very bright star, so it's a good place to begin for finding the Coathanger with your binoculars. The two stars on either side of Altair are called the "Pilot Stars" and if you follow their line going up, drift maybe a little to the left, just after you lose the last Pilot Star out of your field of view you will come upon a fairly bright, close pair of stars that form the feathers of Sagitta the Arrow. Keep going up and a little to the right from the feathers and before they even leave your field of view you will come upon the Coathanger. You will know when you see it.
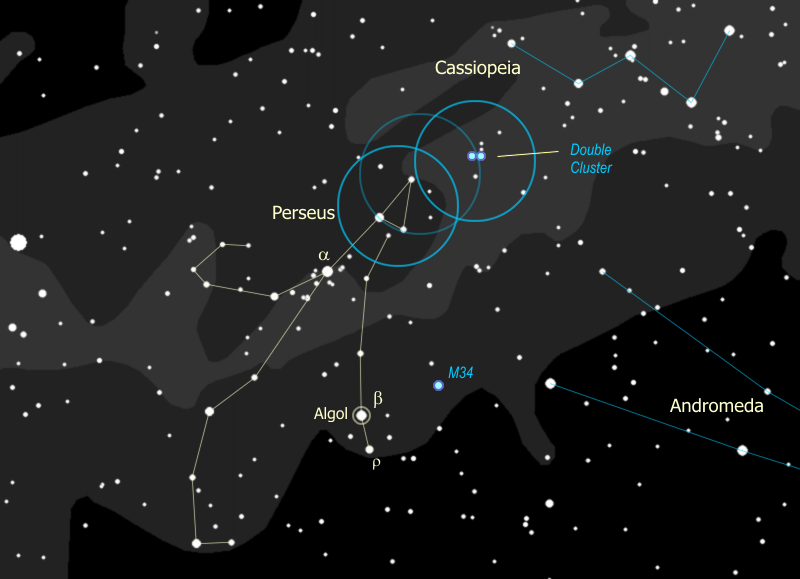
Double Cluster To find the Double Cluster we can start with the constellation Perseus. This hero's helmet forms a distinct, if perhaps not very bright, triangle that is easy to recognize in the binoculars. Move the binoculars up in the direction that the triangle is pointing until a fuzzy patch appears at the right-hand edge of the field of view. Center the fuzzy patch and you'll see actually two fuzzy patches - you've found the Double Cluster.
Star Hopping With A Telescope
 Before discussing the techniques of star hopping with a telescope, we need to address the why:
why star hop when we now have GOTO mounts where you can simply push a button and your telescope will
slew to the object and probably be right there in the eyepiece for you to see? It is a good question, and not
really a new question because before we readily had this technology there were setting circles which could be
used to point a telescope at any specific point in the sky.
Before discussing the techniques of star hopping with a telescope, we need to address the why:
why star hop when we now have GOTO mounts where you can simply push a button and your telescope will
slew to the object and probably be right there in the eyepiece for you to see? It is a good question, and not
really a new question because before we readily had this technology there were setting circles which could be
used to point a telescope at any specific point in the sky.
Obviously, if your telescope doesn't have GOTO capability or setting circles, a star hopping technique will be necessary. But even if you do, there is another reason: star hopping can be fun.
"You can observe a lot by just watching." - Yogi Berra
Star hopping gives you the opportunity to look at parts of the sky that you might otherwise not. Examples are star clusters, nebulas, and maybe even a comet.
With a Telrad / 1X finder
Telrad and other 1X finders have become popular finding tools for one basic reason: simplicity of use. They're intuitive and can be mastered quickly. And you only need a standard naked-eye star chart with the position of your target indicated.
By definition all 1X finders don't magnify. All they do is project either a target or simply a red dot in the sky to indicate exactly (assuming they are properly aligned) in the sky the main telescope is pointing.
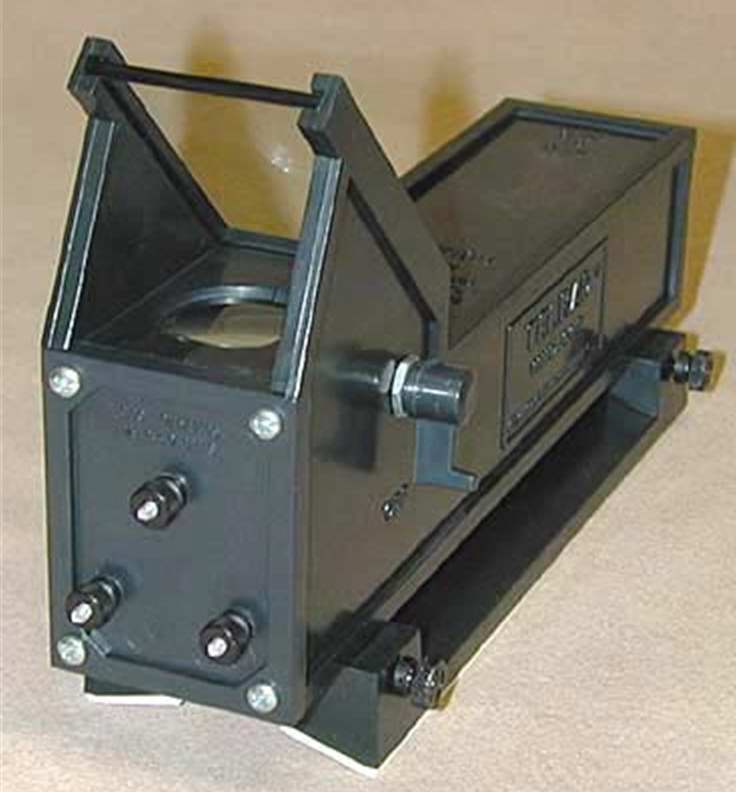
Telrad Finder.
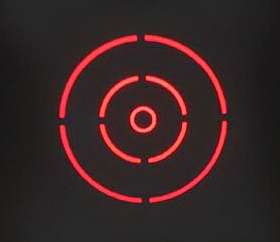
Telrad Sky Target
There are a variety of other 1X finders, but most of them can be called a "Red Dot Finder" as they simply project a red dot in the sky. Our examples that follow are using the Telrad target.
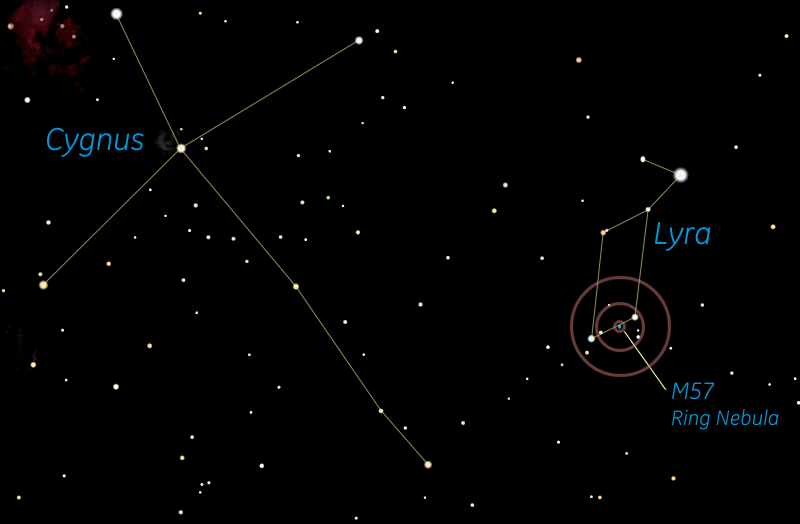
M57 Notice how the Telrad indicator is positioned relative to the stars of the constellation Lyra the Lyre, particularly the bottom two stars of the parallelogram, β (beta) Lyrae on the right and γ (gamma) Lyrae on the left. The 2° circle is just outside β and also just outside the two stars to the south of β. This circle is also passing between γ and the smaller star to the right, just outside the smaller star. By positioning the Telrad in this fashion, the center is directly over M57, the Ring Nebula, and hence the Ring will show up in the eyepiece.
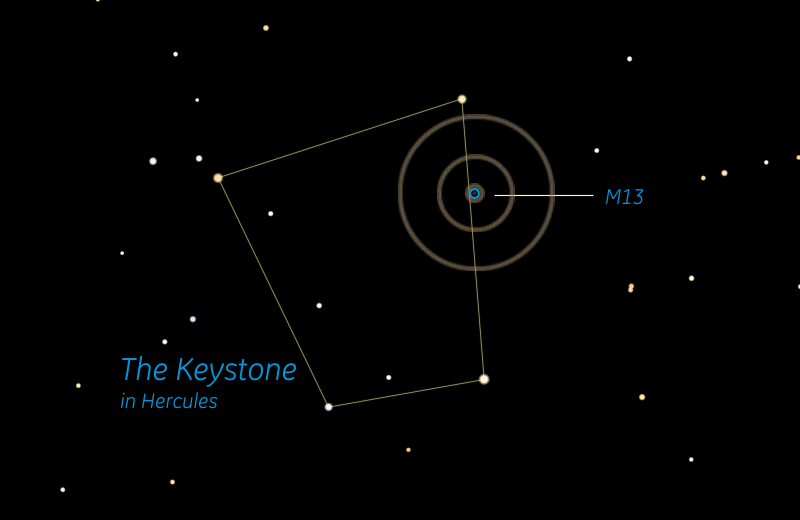
M13 Here the Telrad is positioned with the 4° circle a little below the upper right star of the Keystone in Hercules, with the ½° circle just touching the line between the two right-hand stars. With this positioning M13 should be within the ½° circle and will show up in the eyepiece.
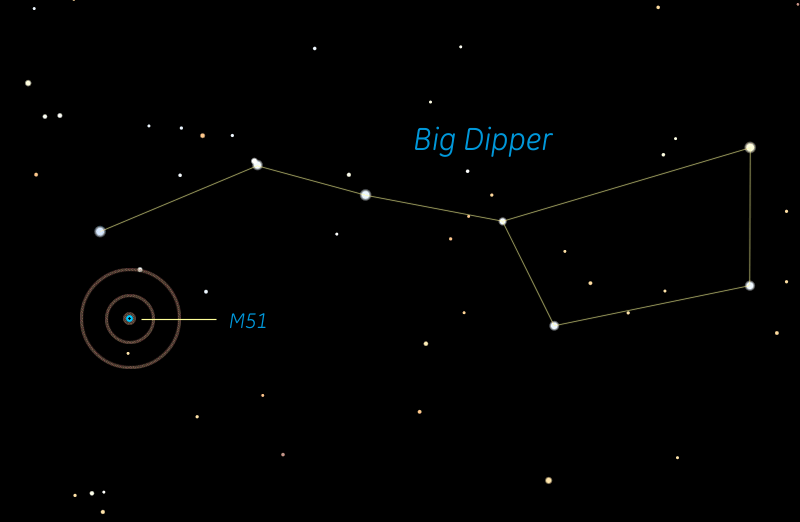
M51 For locating M51, start near the tip of the handle on the Big Dipper, and note the triangle of stars just below this star. By touching the upper left star of this triangle with the 4° circle, and just touching the line between the two left-hand stars with the ½° circle, M51 should be positioned within the ½° circle and will show up in the eyepiece.
Disadvantages: It can become very difficult to use a 1X finder when observing in light polluted skies or when moonlight is interfering. This is when using a finder scope especially becomes a real advantage. And another problem is when your target is far from any easily visible stars.
Commercial Telrad Finder Charts
With a Finder Scope
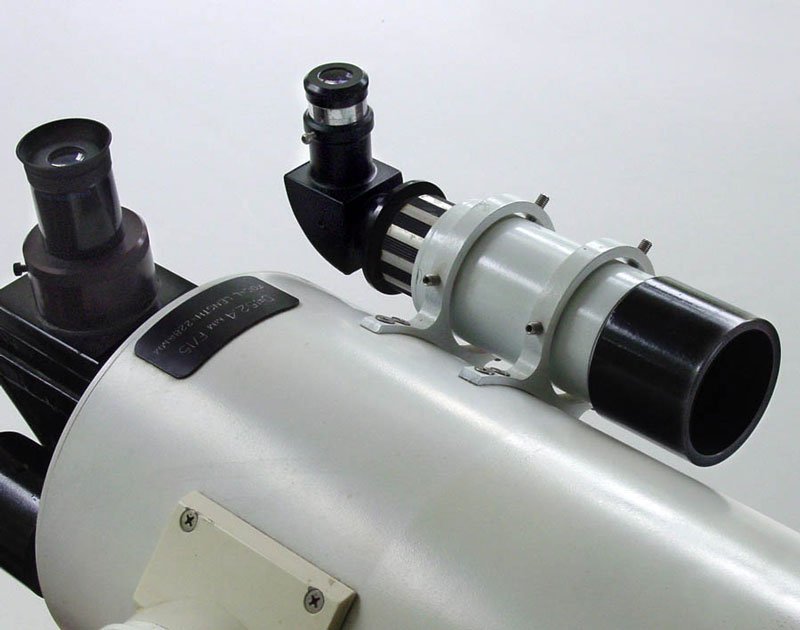
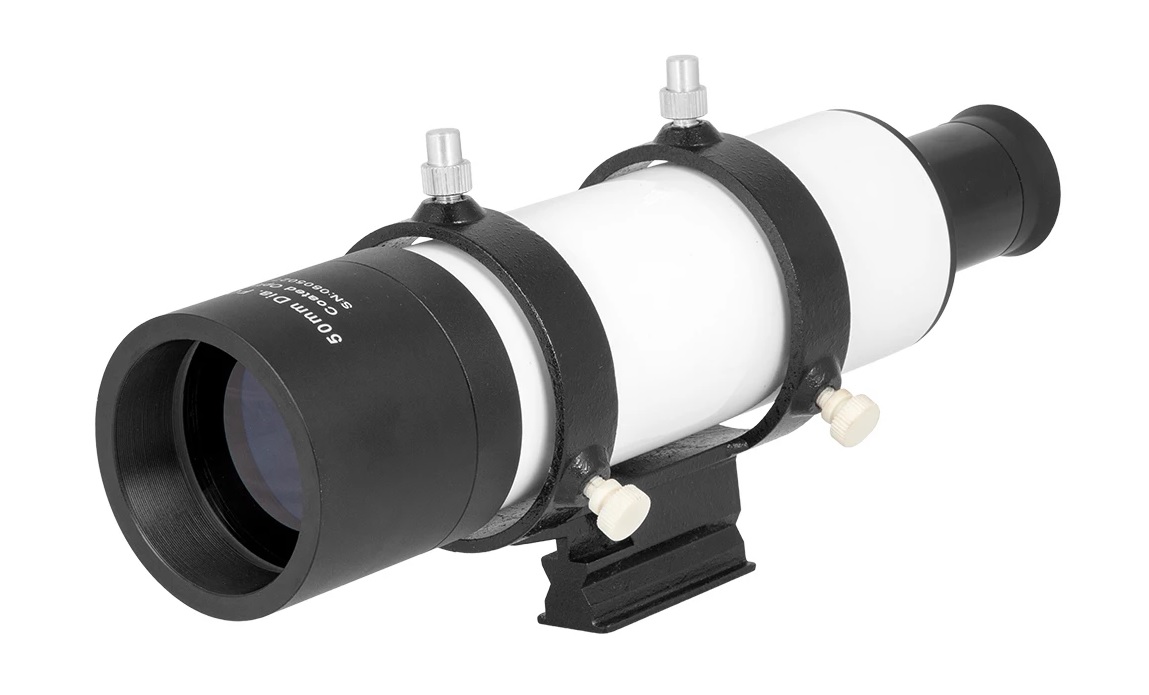
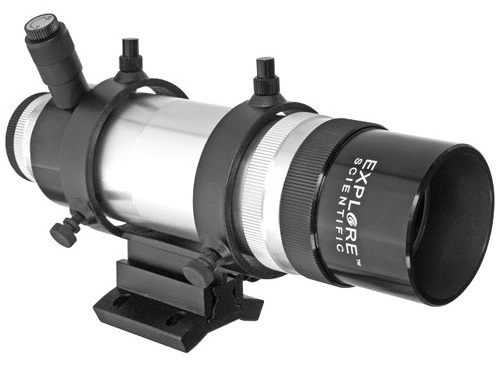
What are the advantages of using a magnifying finder? The primary advantage is exactly that: magnification. This raises the pointing precision and it will allow you to see dimmer stars. But a secondary advantage is the view of the sky you get. The view through almost all finder scopes is that of binoculars. Another great reason to have a good finder scope, one with 8X magnification and a 50mm objective is sometimes the view through the finder can be better than that of the main scope for certain objects.
An Example Star Hop Through a Finder
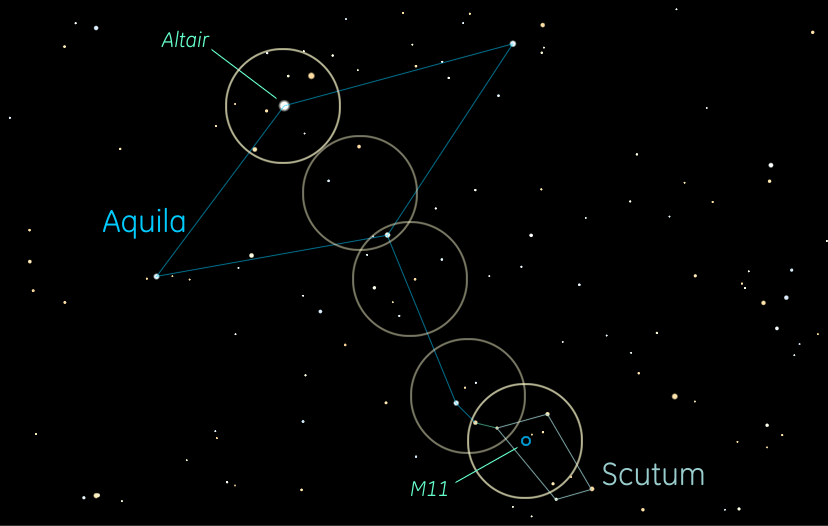
Here we present an example of how to locate M11, aka the Wild Duck Cluster. We start by locating the bright star Altair, the southern most member of the Summer Triangle. In our example we are showing a finder scope with a 6° FOV (field of view). So it shows one way to get to the M11 target. Keep in mind there is no real right or wrong way! Whatever works for you is the best.
 Keep in mind your finder scope may have a
different FOV because it depends on both the magnification and the apparent
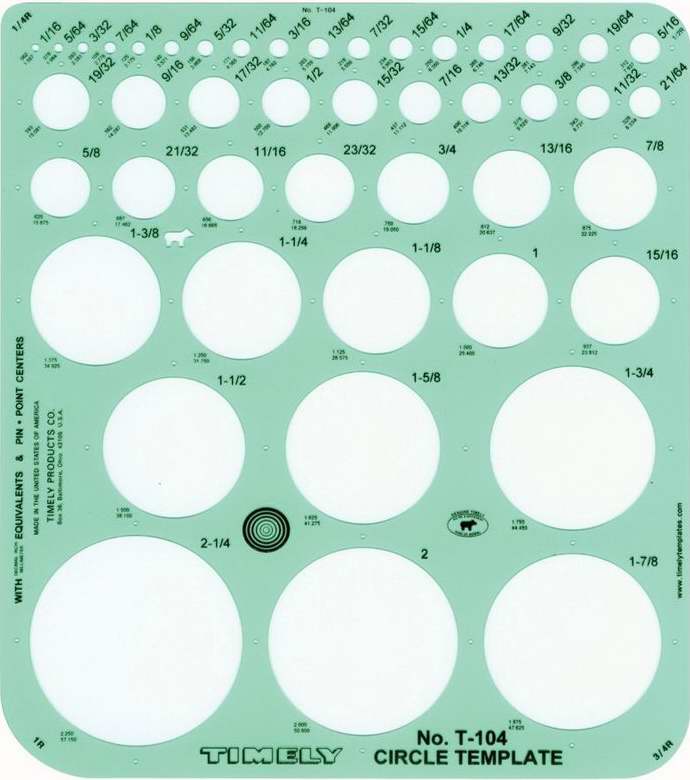
FOV. If you print out the star chart you can plan our star hop with a template like we have shown. But you need to find
what size circle you need that will correspond to your finder's FOV.
Keep in mind your finder scope may have a
different FOV because it depends on both the magnification and the apparent
FOV. If you print out the star chart you can plan our star hop with a template like we have shown. But you need to find
what size circle you need that will correspond to your finder's FOV.
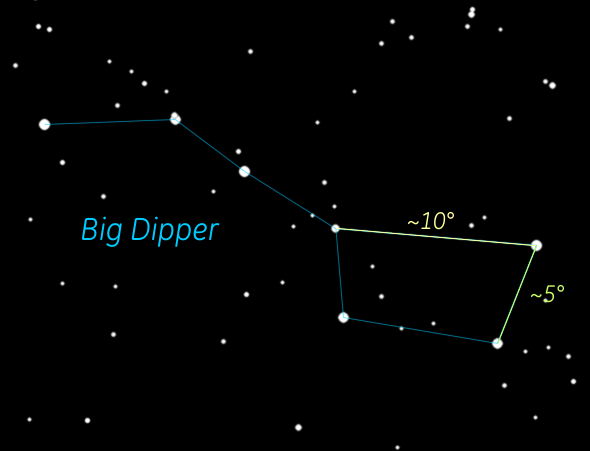 The easiest way to determine the FOV is to simply get it off the specs of your finder. But if that is not available, you can either
approximate it (the circle doesn't need to be exact) by looking at stars in the sky. A good pair of stars to look at are the pointer stars
of the big dipper, called that because they point to the North Star. These stars are about 5° apart. Another way to get a fairly precise figure is
to find a star close to the celestrial equator and time how long it takes to drift out of the field. The star will drift one degree every 4 minutes.
But you can see the problem. A typical finder with a 6° field will take 24 minutes to drift that far!
The easiest way to determine the FOV is to simply get it off the specs of your finder. But if that is not available, you can either
approximate it (the circle doesn't need to be exact) by looking at stars in the sky. A good pair of stars to look at are the pointer stars
of the big dipper, called that because they point to the North Star. These stars are about 5° apart. Another way to get a fairly precise figure is
to find a star close to the celestrial equator and time how long it takes to drift out of the field. The star will drift one degree every 4 minutes.
But you can see the problem. A typical finder with a 6° field will take 24 minutes to drift that far!
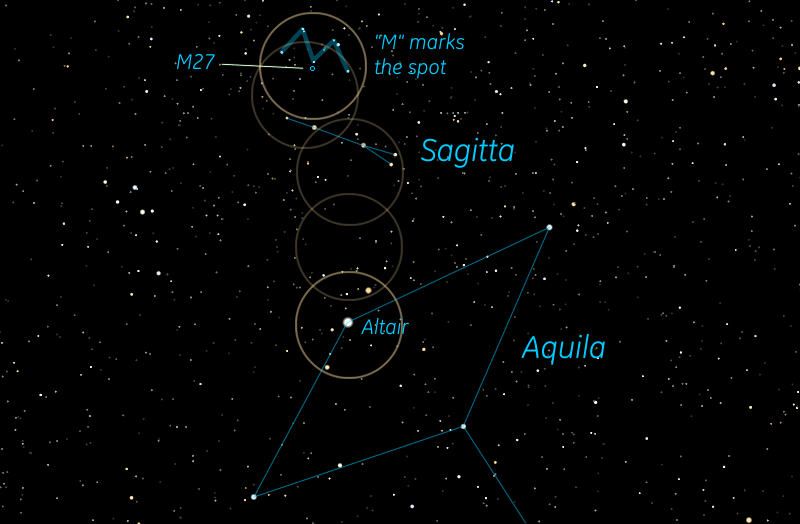
M27 To get to M27 once again begin at the star Altair in Aquila the Eagle, which you can confirm when you see
the two Pilot Stars on either side of this star in the viewfinder. Slide the field of view to the North, and shortly
after the last Pilot Star shifts out of the viewfinder you should see the distinctive tail feather stars of
Sagitta the Arrow slide into view. You can then move along Sagitta to the East, and once you find the two stars
forming the tip of the arrow, again shift to the North until you see a grouping of stars in the shape of the letter "M".
M27, the Dumbbell Nebula, is right at the central point of the "M". When you look in the eyepiece you should be able
to see the hourglass shape of this nebula.
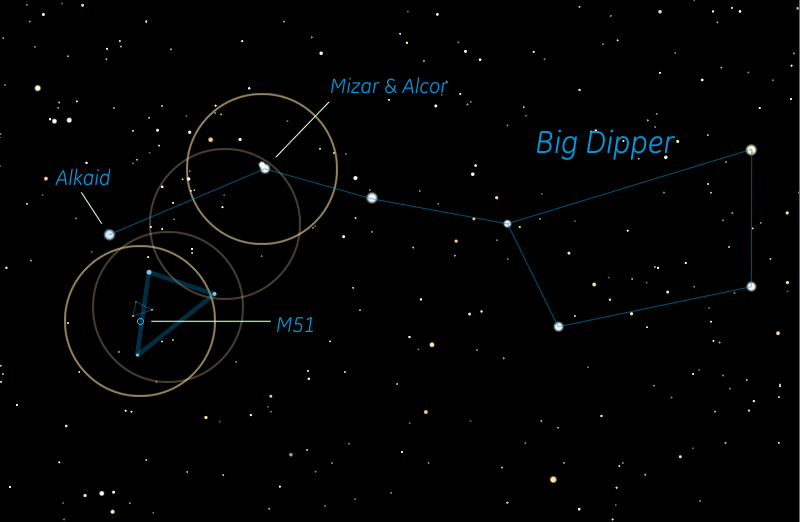
M51 We will use two triangles of stars to locate M51, a large, fairly bright triangle and a tiny triangle,
just bright enough to see in the viewfinder. Mizar and Alcor, the double star, can be a good place to start because
its unique and distinctive appearance means you can be sure you are targeting the right spot. Also Alcor, the
smaller star, points to the East from Mizar, and you can simply slide your field of view to the South to find the
large triangle, just about one field of view away. Once you've centered the larger triangle, the tiny one can be
used as a reference to determine where M51 should be. Center your crosshairs on that location and you will find M51 in the eyepiece.
Alkaid, the star at the tip of the handle of the Big Dipper, can also be used as a starting point, in which case you
will have one star from the large triangle (and possibly one from the tiny triangle) already in your field of view,
similarly to above, center the the large triangle in the viewfinder, locate the tiny triangle, then center the crosshairs
on M51 using the tiny triangle as your reference.
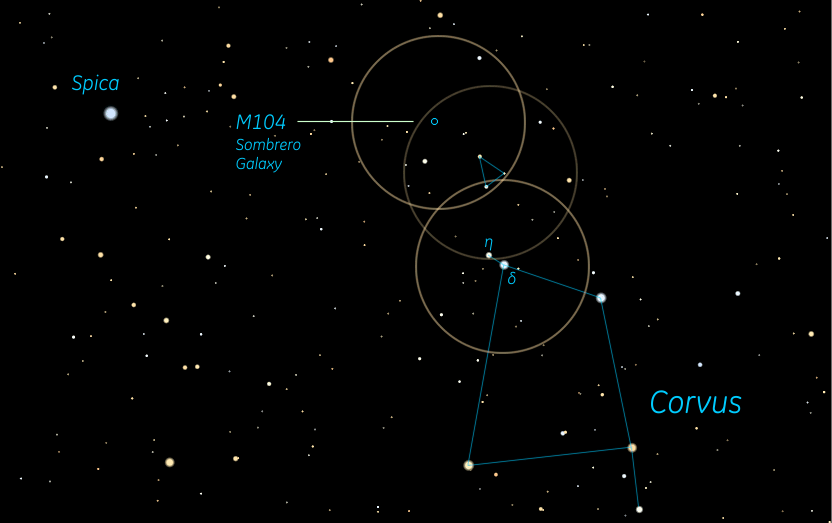
M104
To find M104, the Sombrero Galaxy, a good place to start is with the constellation Corvus, a very conspicuous trapezoid
of stars in the southern Spring sky. The pair of stars at the upper left corner of this trapezoid are δ (delta) and η (eta).
These two stars are good, both for confirming your viewfinder is in the right spot, and also establishing orientation, with η,
the smaller star, pointing a little north of east from δ. Move the field of view just a little to the north to find a
triangle of stars that forms a convenient arrow head pointing you to the Sombrero. When you place this triangle right
at the southwest edge of the viewfinder you are right on M104.
The Trouble With Finders
Though a big advantage of the finder scope is pointing precision, that assumes you have adequately aligned your finder. Before you use your finder to star hop, it is always a good idea to check that alignment. Point at an easy object like the moon, a planet, or a bright star.
Additional advantages or difficulties depend on the finder scope type and there are 4 of them.
-
Straight-thru, image upside down
 Once upon a time this was the only kind of finder scope you could get. The image is upside down and
that is the problem. Yes, you can simply print or view your star chart upside down (after all as the
saying goes, there is no such thing as right-side up in space), but moving your scope as you view through
it needs to be learned because to move the scope to the right, you move it left. It's not that it can't be learned, but it is simply not intuitive
and therefore causes unnecessary frustration, especially now when you can get an erect image finder.
Once upon a time this was the only kind of finder scope you could get. The image is upside down and
that is the problem. Yes, you can simply print or view your star chart upside down (after all as the
saying goes, there is no such thing as right-side up in space), but moving your scope as you view through
it needs to be learned because to move the scope to the right, you move it left. It's not that it can't be learned, but it is simply not intuitive
and therefore causes unnecessary frustration, especially now when you can get an erect image finder.
-
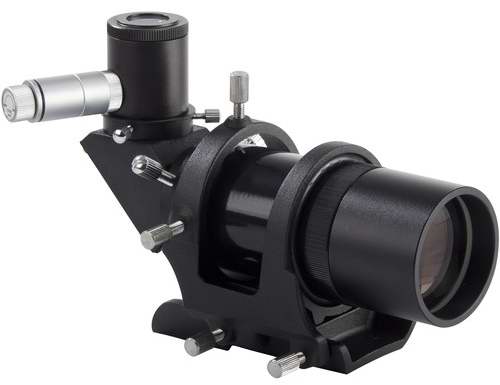
Right-angle finder scope with an amici roof prism.
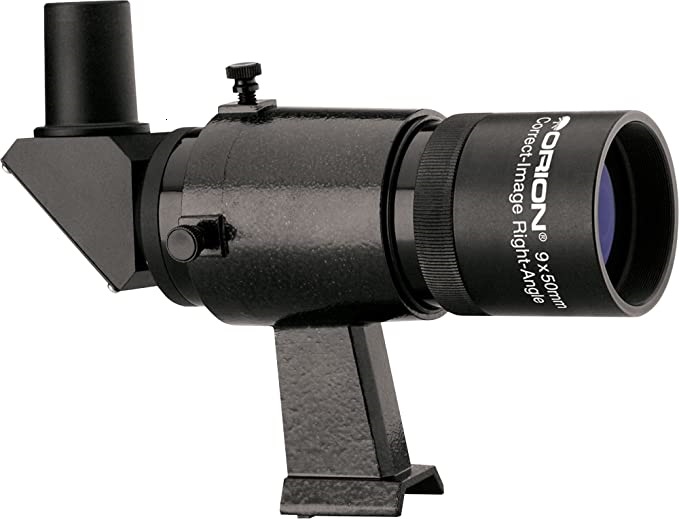 As a right-angle finder, you have generally comfortable viewing positions and the unintuitive movement.
But the view through this type of prism is actually a correct right-side up and correct left-right (in other words, not a mirror image).
As a right-angle finder, you have generally comfortable viewing positions and the unintuitive movement.
But the view through this type of prism is actually a correct right-side up and correct left-right (in other words, not a mirror image).
-
Right-angle finder scope with a standard prism.
This type of finder has the advantage of generally comfortable viewing positions. But that comes at a big cost: very unintuitive movement. Also, though the view is technically right-side up, it's a mirror image. We have not included a picture because such a finder looks exactly like one with an amici roof prism and you can probably ignore this type of finder as we believe no one manufactures this type any longer.
-
Straight-thru erect image finder scope.
 This type of finder offers the same advantage as the upside-down type, but the right-side up feature adds intuitive operation.
Need to move the telescope right, move it to the right! It still has the disadvantage of possibly some awkward head
positions, but with the straight-thru view, rough pointing is relatively easy.
This type of finder offers the same advantage as the upside-down type, but the right-side up feature adds intuitive operation.
Need to move the telescope right, move it to the right! It still has the disadvantage of possibly some awkward head
positions, but with the straight-thru view, rough pointing is relatively easy.
The Best of Both
If you can afford it and want the advantages of a 1X finder and a standard finder, you can mount both of them.
In the Crosshairs
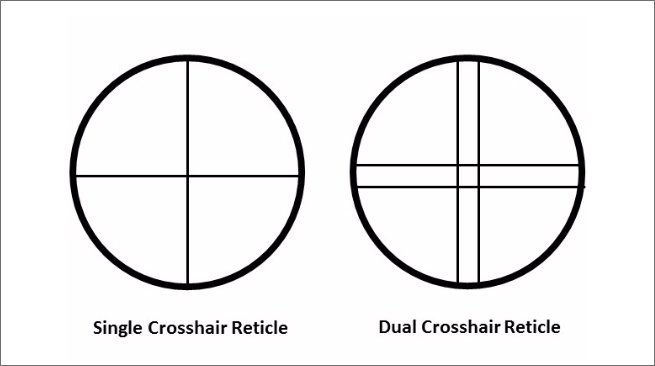
All commercial finders come with an eyepiece with crosshairs. The two most common types are shown here: single and dual crosshairs. When properly aligned,
they mark the exact point in the sky the telescope is pointing.
 However, can you see them? Sadly, in relatively light polluted skies, they can be easily seen.
But when you are in more dark skies, they may be very difficult to see. So you can also purchase finders with illuminated crosshairs. These are usually
easy to spot because there will be a module near the eyepiece that has the battery compartment. Illuminated finders almost always have a dimmer/brightening
dial to adjust the light to just enough light.
However, can you see them? Sadly, in relatively light polluted skies, they can be easily seen.
But when you are in more dark skies, they may be very difficult to see. So you can also purchase finders with illuminated crosshairs. These are usually
easy to spot because there will be a module near the eyepiece that has the battery compartment. Illuminated finders almost always have a dimmer/brightening
dial to adjust the light to just enough light.
 Return to Stargazing Home Page
Questions
Your questions and comments regarding the Stargazing section are welcome.
You can e-mail the author, Randy Culp for inquiries,
suggestions, new ideas or just to chat.
Updated 18 July 2023